You are not logged in.
- Topics: Active | Unanswered
#1 2020-12-09 21:21:32
- sinned6915
- Member
- Registered: 2019-08-22
- Posts: 52
Resin Calibration a la Photonsters method and Dynamic Curing
I am trying to figure out how to do resin calibration in a manner similar to the way that Photonsters do, with an calibration object but using the dynamic expsoure function in nanoDLP. .
For those not familiar with it, here is their writeup and instructions - https://github.com/altLab/photon-resin-calibration
Printing this at the desired layer height and at multiple exposure times -

gives you something like this to visually assess the resin cure times-

I trimmed it down into a unit object to try and use for dynamic cure times. My files are on git here- https://github.com/nionio6915/nanoDLP-Resin-Calibration

but I am struggling to get the dynamic cure working right.
Is anyone using this function currently? Can you provide and tips on setting this up?
Specifically, I am wondring about the raft at the bottom of the model. I am wondering if we need to actaully make this into 2 model/gcode files and splice them together as one plot. The solid base then the everything above the datum in the object, that being the floor where the object features start. Like this: 
Here is where I am at currently-


best regards,
sinneD
Last edited by sinned6915 (2020-12-09 21:56:26)
Offline
#2 2020-12-10 17:10:45
- Shahin
- Administrator
- Registered: 2016-02-17
- Posts: 3,546
Re: Resin Calibration a la Photonsters method and Dynamic Curing
Your setup seems correct, but check layer 3 maybe there is an empty layer there. Outside of that I believe it should work.
Offline
#3 2020-12-10 17:40:10
- sinned6915
- Member
- Registered: 2019-08-22
- Posts: 52
Re: Resin Calibration a la Photonsters method and Dynamic Curing
The bottom of their model has a recess in the back. I am not sure of its purpose.

The other issue I am identifying is how to identify each sample after printing. What I end up with is 6 resin covered bars that are for all intensive purposes identical. The photonsters combined model has an identifer on each bar of the plate. You have to be carefull in removing them and washing them to know which one is which.
Offline
#4 2020-12-10 23:45:21
- sinned6915
- Member
- Registered: 2019-08-22
- Posts: 52
Re: Resin Calibration a la Photonsters method and Dynamic Curing
Here is the result of the trial so far-

I took the build surface off the platform and washed it. Honestly, I lost track of which end was which- what end is 7 seconds and which end was 9 seconds. I had to go back to the plate generator and look at the orientation of the postive-negative spaces to get the orientation right. I think I am very much over exposed. I will try for shorter exposure times.
I think that the recess on the back of the object is not a good idea. I revised the model to have a solid back and chamfered edges as well, so that it might be easier to pop off from the build platform. 
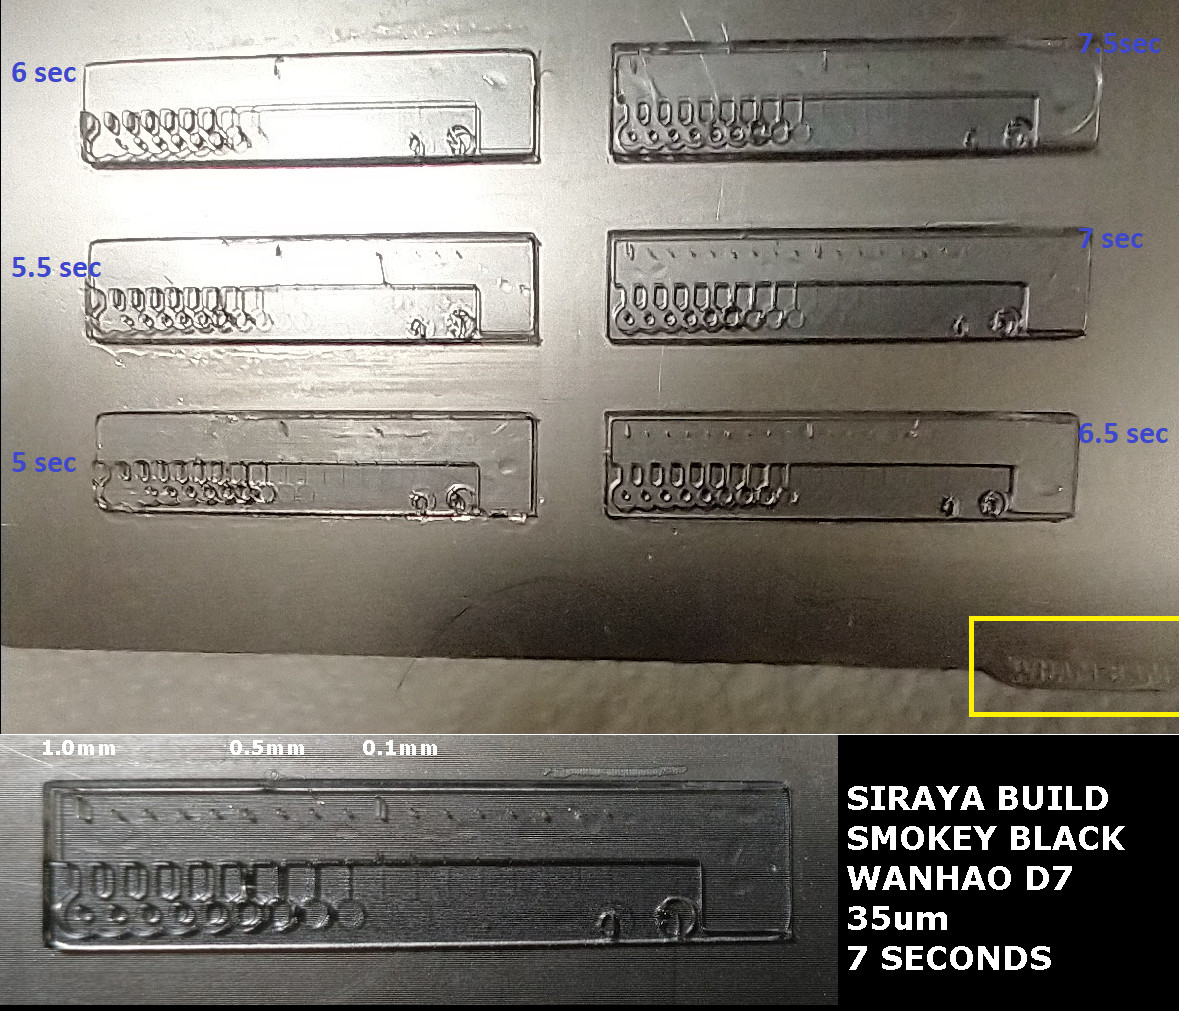
Here is my next trial run: 5 to 7.5 seconds. Even though I enterd 5 - 8, nanoDLP fit 6 objects on the plate.
Notice how I took the preview midway through so that I have a frame of reference to read the plate.
For the next print, I will align the build plate tab to the bottom right corner. Looking at the plate picture above, our view is of the bottom of the plate, and the tab is on the top left of the image. 
Last edited by sinned6915 (2020-12-11 00:26:02)
Offline
#5 2020-12-11 05:27:08
- sinned6915
- Member
- Registered: 2019-08-22
- Posts: 52
Re: Resin Calibration a la Photonsters method and Dynamic Curing
This is the result of the second trial of resin calibration. The index position of the plate is not where I thought it to be, its 180 degrees off. I had the tab at the front left corner of the build plate as you face the machine. Instead, I think the 0,0 corner is at the back right. I have never paid attention until now.

I am thinking that Siraya Build just does NOT like going under 50um in thickness. The features are gone below 0.2/0.1mm .
Next I will try it as 50um in layer heigh and see what results I get.
I'd be curious if anyone else can run similar tests and post their results for comparision.
sinneD
Last edited by sinned6915 (2020-12-13 20:01:06)
Offline
#6 2020-12-13 20:02:19
- sinned6915
- Member
- Registered: 2019-08-22
- Posts: 52
Re: Resin Calibration a la Photonsters method and Dynamic Curing

Offline